
Genesis Heat set Paints and Mediums (glazing gel, thinning medium, matte varnish)
Glass dish, ceramic palette, other suitable glazed or glass container (never use plastics or paper palettes with GHSP)
Odorless Thinner (100% odorless mineral spirits) Any brand
- Brushes
- Cosmetic sponges
- Oven Thermometer
- Preheated Oven (or heatgun)
- Doll
Clean rags and paper towels or napkins (no colors! white only)
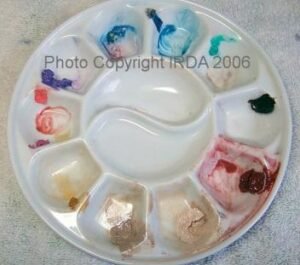
STo begin, we will lay out our palette. My palette consists of
Pyrrole Red 02
Pyrrole Red 05
Dioxazine Purple 04
Burnt Umber
Phthalo Blue 02
Phthalo Green 06
Yellow Ochre
Flesh 08
Flesh 07
You can use similar colors and achieve perfectly good results. These just happen to be the colors I prefer.
Use just the smallest amounts (about the size of a pea). The way I teach you to dilute the colors with the thinner you will be amazed at how little of the paint you actually use.
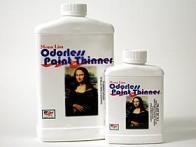
 I normally use 100% mineral spirits (odorless paint thinner). I like Mona Lisa brand because it’s easy to find and inexpensive. But any brand will do–I’ve even seen it at Walmart in the house painting section.
I fill the well in the center with that, leaving the other center well clean for mixing small amounts of colors.
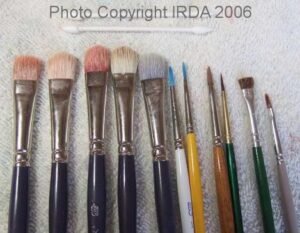
From left to right, my favorite brushes: Maxine’s Mop 1/2 inch (x 5), #1 Round Brush, #00 Round brush, #2 Round brush, another #00 round, scrubby brush, #1 filbert
I also do a lot of painting using cosmetic sponge wedges. I normally use one wedge for each color. Now let’s get started!
Dampen the Maxine’s Mop brush in the odorless thinner.
Picking up Flesh 08 on brush
Wipe the flesh paint onto a sponge
Now pounce the loaded sponge onto the limb
Pouncing is “bouncing” the sponge up and down without any sideways movement. Straight up and down, over and over again.
Once again, pounce the Flesh 08 and work it into the arms

I also do a lot of painting using cosmetic sponge wedges. I normally use one wedge for each color. Now let’s get started!

Dampen the Maxine’s Mop brush in the odorless thinner.

Picking up Flesh 08 on brush

Wipe the flesh paint onto a sponge

Now pounce the loaded sponge onto the limb

Pouncing is “bouncing” the sponge up and down without any sideways movement. Straight up and down, over and over again.

As you pounce the paint pattern begins to get finer and finer.
If this doesn’t happen after a minute or two, try blotting out the sponge once on a thick pad of napkins and then going back over the areas.

Eventually it will look like this. When the odorless thinner evaporates after a few more minutes…

It looks like this. It’s ready to bake.

Now starting to work on the arms. Reload your brush and sponge again


Once again, pounce the Flesh 08 and work it into the arms


Cover an old baking tray or cookie sheet with a towel that doesn’t have frayed dangling threads. You can safely bake on this towel surface, and you must use a towel or the hot metal will create shiny flat spots on your doll parts when you bake. Not good.
Place the limbs inside a PREHEATED 265*F (130*C) oven and set a loud timer for 8 minutes.
You may use a Heatgun, however I do not recommend this method as it’s too difficult to ensure even heating on a 3-dimensional object to cure or dry the paint. Heatguns are best left for spot-painting/drying only, in my opinion. However if you need to use a heatgun please be sure to test every inch of the painted surface to be sure the paint is permanent.
After baking or setting with a heatgun, let the vinyl parts cool. Then take a clean white swab and moisten slightly with water, and rub gently over the painted areas. If any paint comes off, you must heatset that area again.
Every oven is different, and every doll can vary in the time it takes to dry the GHSP. 8 minutes seems to work well for me on normal vinyl dolls. I have found that on the silicone-vinyl dolls such as Masterpiece or Ashton Drake, it takes a few minutes longer for the surface of the doll to bake, so I set the timer on those parts at 10 minutes and then test carefully.
Now we’re ready to move on to the second layer, using a blushy transparent blend of paints.