
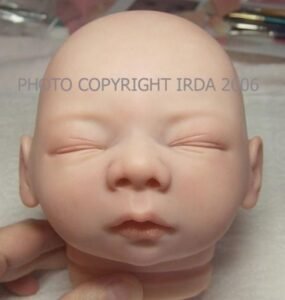
GENESIS 201
BLUSHING & CREASES (3 Part Class)
Once you have your foundation layer baked, it’s time to begin adding a transparent reddish layer of color by pouncing and stippling it on. The effect we want is not a coat of all over color. We want a blotchy and slightly spotty effect as we put this new layer on.
We begin mixing this new blushing color using Pyrrole Red 02. You can also start with Quinacridone Crimson 01. If any of these reds is too vibrant, too feverish looking, remember you can tone it down with a bit of green.
My brush is slightly dampened with odorless thinner. I pick up a small dot of my red.
Using a bit of thinner, I “wash” the red out of my brush into the well.
Now I pick up a very tiny dot of burnt umber
Mix the burnt umber into the red and press the brush well against the side of the well to get all the thinner and paint out into the well.
Now, pick up the tiniest possibly dot of Phthalo Blue 03
(NOTE: You will NOT need much, or any, blue if you use Q. Crimson 01 as your base red)
Mix the blue into the well
Finally, another dot of red may be needed. The color you are after is Blood Red in a transparent wash. This means you have a large ratio of thinner to paint.
Once the color is blended properly, moisten a cosmetic sponge wedge with plain thinner. Blot out any excess. Now, place one or two dots of color in the sponge. An irregular spot or spoltch of color is good.
Use the sponge to lightly pounce on the color. Remember, you want uneven blotches of color.
With minimal blending, this is how it should look
Other cheek…
Continue all over the entire doll’s head.
This first blushing is so subtle I tried to photograph it so you can see the difference.
Picking up just a little of the same color, you can apply the stork-bite to the back of the neck if you like.
I usually apply just a little of this transparent blush color to the lips in a light all-over stain. I like to use a small filbert for this. Also, put a little inside the nostrils too, and inside the eyelid creases. The first blush coat is ready to bake. Set your head aside so the odorless thinner can evaporate.
Let’s get the limbs done.
The limbs have also had a foundation fleshtone layer & veining completed and baked on.